

How to Replace the Crankshaft Position Sensor on a Nissan Xterra
The crankshaft position sensor (CKP sensor) plays a vital role in your Nissan Xterra’s performance. It monitors the crankshaft’s rotation and sends precise timing information to the engine control module (ECM). When this sensor fails, your engine may stall, misfire, or refuse to start. In this comprehensive guide, we’ll walk you through the full process of diagnosing, removing, and replacing the crankshaft position sensor in your Xterra, ensuring professional-level results every time.
Content in this publication
- Understanding the Function of the Crankshaft Position Sensor
- Common Symptoms of a Faulty Crankshaft Position Sensor
- Safety Preparations Before Replacing the Sensor
- Tools and Parts You’ll Need
- Locating the Crankshaft Position Sensor
- Step-by-Step: How to Replace the Crankshaft Position Sensor
- Resetting the Engine Control Module (ECM)
- Recommended Maintenance Practices
- Troubleshooting After Installation
- Cost of Replacing the Crankshaft Position Sensor
- Key Takeaways
- Frequently Asked Questions
- Conclusion
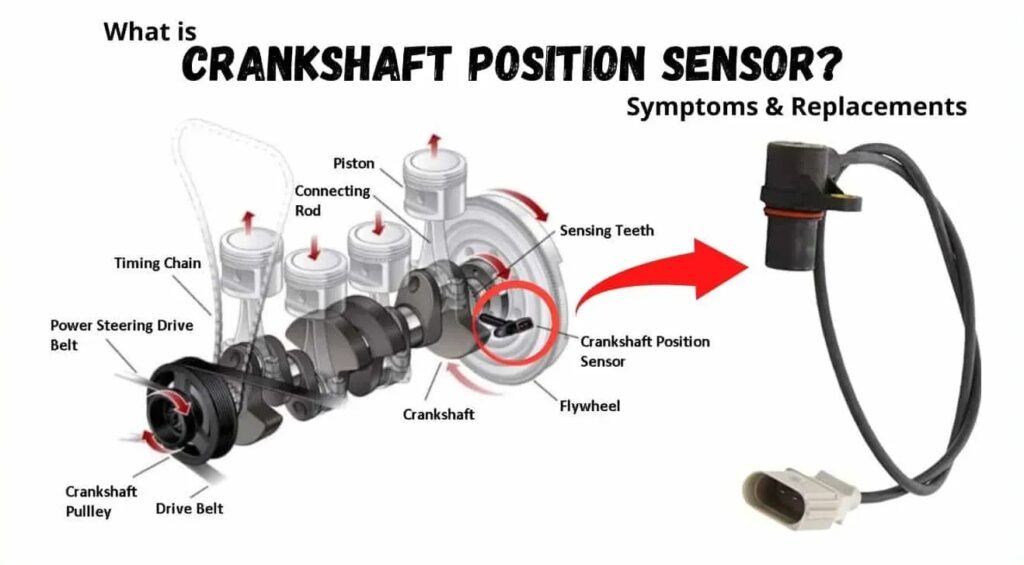
Understanding the Function of the Crankshaft Position Sensor
The crankshaft position sensor detects the position and rotational speed of the crankshaft. This data helps the ECM control ignition timing and fuel injection. Without an accurate signal, the engine cannot synchronize combustion cycles, leading to hard starts, poor fuel efficiency, and eventual stalling.
Common Symptoms of a Faulty Crankshaft Position Sensor
When the sensor begins to fail, you may notice several warning signs, including:
- Intermittent stalling: The engine may cut off while idling or accelerating.
- Difficult starting: You may need multiple attempts to start the engine.
- Rough idling or misfiring: The engine runs unevenly and lacks power.
- Check engine light: Diagnostic code P0335 or related crankshaft position sensor faults may appear.
- Reduced fuel economy: The ECM compensates with incorrect timing, wasting fuel.
Safety Preparations Before Replacing the Sensor
To ensure safety and avoid electrical issues during replacement:
- Park on level ground and engage the parking brake.
- Allow the engine to cool completely.
- Disconnect the negative battery cable to prevent electrical shorts.
- Wear gloves and safety glasses when working under the hood.
Tools and Parts You’ll Need
| Tool / Material | Description |
|---|---|
| 10mm socket wrench | For the sensor mounting bolt |
| 12mm socket wrench | For access panels or shields |
| Ratchet and extension bar | For improved reach |
| New crankshaft position sensor | OEM or high-quality aftermarket replacement |
| Dielectric grease | To protect electrical connectors |
| Clean rag | To remove debris and oil |
Locating the Crankshaft Position Sensor
The crankshaft position sensor on a Nissan Xterra is located near the flywheel housing, on the rear side of the engine block. You’ll recognize it as a small cylindrical sensor with a two-wire connector secured by a single bolt.
Step-by-Step: How to Replace the Crankshaft Position Sensor
1. Disconnect the Electrical Connector
Locate the two-wire plug connected to the sensor. Press the release tab and gently pull the connector off.
2. Remove the Mounting Bolt
Use a 10mm socket wrench to loosen and remove the bolt that secures the sensor to the engine.
You may be interested in reading How to Replace the Alternator on a 2005–2015 Nissan Xterra: Complete Step-by-Step Guide
3. Extract the Old Sensor
Gently wiggle and pull the sensor straight out of its mounting hole. If it’s stuck, use light prying pressure—avoid bending or damaging the surrounding area.
4. Clean the Mounting Area
Use a clean rag to wipe away oil, dirt, or corrosion from the mounting hole to ensure proper seating of the new sensor.
5. Install the New Sensor
Apply a small amount of dielectric grease to the O-ring of the new sensor. Insert it into the hole until it sits flush, and tighten the bolt to 10 Nm (7.4 ft-lb).
6. Reconnect the Electrical Plug
Align the connector and push until it clicks securely in place.
7. Reconnect the Battery
Reattach the negative battery cable and ensure it’s tightened properly.
8. Start the Engine
Start the vehicle to verify that it idles smoothly and that the check engine light has turned off. If necessary, use a scanner to clear stored fault codes.
Resetting the Engine Control Module (ECM)
After replacing the sensor, reset the ECM so it can learn the new sensor’s characteristics:
You may be interested in readingHow to Replace the Alternator on a 2005–2015 Nissan Xterra: Complete Step-by-Step GuideYou may be interested in reading
 Nissan Xterra Wiper Blade Size Guide (2000–2015)
- Disconnect the negative battery terminal for 10 minutes.
- Reconnect it and start the engine.
- Let the engine idle for 5–10 minutes without pressing the accelerator.
- Turn off the engine, then restart it to ensure normal operation.
Recommended Maintenance Practices
To keep your crankshaft position sensor performing optimally:
- Inspect the sensor connector for corrosion or loose wires during oil changes.
- Keep the area around the flywheel housing clean to prevent buildup.
- Replace the sensor approximately every 60,000 to 90,000 miles as a preventive measure.
- Use only OEM-quality sensors for consistent performance and reliability.
Troubleshooting After Installation
If issues persist after installation, check the following:
- Sensor connector: Ensure it’s fully seated and not damaged.
- Wiring harness: Look for cuts, frays, or melted insulation.
- Sensor resistance: Use a multimeter to test continuity. Typical resistance should fall between 500–700 ohms (verify with your service manual).
- ECM codes: Scan again for any pending or stored DTCs.
Cost of Replacing the Crankshaft Position Sensor
| Component | Estimated Cost (USD) |
|---|---|
| Sensor part | $25–$60 |
| Labor (shop estimate) | $80–$150 |
| DIY total cost | Around $30 |
Replacing the sensor yourself can save over $100 in labor, making it one of the most cost-effective repairs for restoring engine reliability.
Key Takeaways
- A failing crankshaft position sensor can cause severe performance issues, including engine stalling or failure to start.
- Replacing it requires only basic tools and about 30–45 minutes of work.
- Always clean the mounting area and reset the ECM for best results.
- Regular maintenance can extend the life of both your new sensor and the engine’s timing system.
Frequently Asked Questions
How long does it take to replace a crankshaft position sensor on a Nissan Xterra?
Typically, the job takes 30–60 minutes for DIYers and less than an hour for professionals.
Can I drive with a bad crankshaft position sensor?
No. Driving with a failing CKP sensor can cause the engine to stall unexpectedly and may lead to further damage.
Will replacing the sensor clear the check engine light?
Once the ECM recognizes proper readings or you clear the codes with a scanner, the light should turn off.
Is an OEM sensor necessary?
While high-quality aftermarket sensors can work, OEM sensors ensure accurate readings and long-term reliability.
How to Replace the Alternator on a 2005–2015 Nissan Xterra: Complete Step-by-Step GuideYou may be interested in reading
Nissan Xterra Wiper Blade Size Guide (2000–2015)You may be interested in reading
Nissan Xterra Battery Size Guide (2001–2015): Complete Fitment and SpecificationsConclusion
Replacing the crankshaft position sensor on your Nissan Xterra is a straightforward yet crucial task that ensures your SUV continues to run smoothly and reliably. By following this detailed guide, you can restore optimal engine timing, eliminate stalling issues, and avoid costly repair shop visits—all with confidence and precision.
If you want to know other articles similar to How to Replace the Crankshaft Position Sensor on a Nissan Xterra you can visit the category Service and Parts.
Vauxhall Meriva Code 24: Meaning, Causes, and Easy Fixes
Vauxhall Meriva Code 16: Meaning, Causes, and Fixes
Vauxhall Meriva Code 4: Meaning, Causes, Diagnosis, and Fixes
Vauxhall Meriva Head Gasket Replacement Cost UK: Complete Price Guide
Vauxhall Meriva Tyre Pressure PSI: Complete Guide
Vauxhall Meriva Fault Codes: Meanings, Causes, and Fixes
Leave a Reply
More content of your interest