

Nissan Xterra Headlight Bulb Replacement: Complete Guide to Better Night Visibility
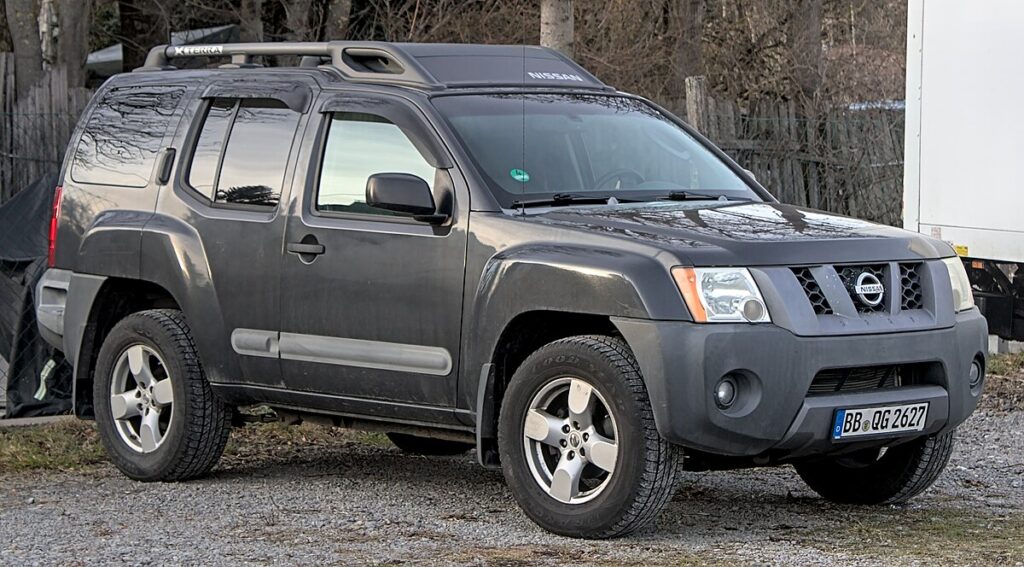
When your Nissan Xterra’s headlights start to dim or fail, replacing the bulbs isn’t just a maintenance task — it’s essential for safety, visibility, and legal compliance. In this comprehensive guide, we walk you through every step of the Nissan Xterra headlight bulb replacement process, from identifying the correct bulb type to troubleshooting common post-installation issues.
Content in this publication
- Why Replacing Your Nissan Xterra Headlight Bulbs Matters
- Understanding the Nissan Xterra Headlight System
- Signs It’s Time to Replace Your Xterra’s Headlight Bulb
- Tools and Materials You’ll Need
- Safety Precautions Before Starting
- Step-by-Step Nissan Xterra Headlight Bulb Replacement
- Headlight Aim and Alignment Adjustment
- Troubleshooting Common Issues
- LED vs. Halogen vs. HID Bulbs — Which Is Best for the Xterra?
- Maintenance Tips for Long-Lasting Headlights
- When to Consult a Professional
- Cost Breakdown: DIY vs. Professional Service
- Frequently Asked Questions (FAQs)
- Final Thoughts
Why Replacing Your Nissan Xterra Headlight Bulbs Matters
Driving an Xterra often means navigating rugged terrain, dark trails, or poorly lit highways. Functional headlights ensure that you see the road clearly — and that others can see you. A properly replaced bulb restores full illumination, improves nighttime safety, and helps your SUV maintain compliance with traffic regulations.
Understanding the Nissan Xterra Headlight System
The Nissan Xterra features a robust headlight system that varies slightly depending on the model year and trim. Most versions use halogen bulbs, though some higher trims and aftermarket upgrades may include HID or LED options. Knowing your bulb type ensures compatibility and prevents premature failure.
| Model Year | Low Beam Bulb Type | High Beam Bulb Type |
|---|---|---|
| 2005–2008 | H13 (Halogen) | H13 (Halogen) |
| 2009–2015 | H13 or 9007 (varies by trim) | H13 or 9007 |
| LED Upgrade Kit (optional) | LED Conversion Kit | LED Conversion Kit |
Signs It’s Time to Replace Your Xterra’s Headlight Bulb
Ignoring early symptoms of bulb failure can lead to dangerous driving conditions. Watch for these signs:
- Dim or flickering lights – an early warning of filament wear.
- Uneven brightness – one headlight appears duller than the other.
- Intermittent illumination – a failing connection or aging bulb.
- Complete failure – total burnout requiring immediate replacement.
- Dashboard warning – some Xterra trims display a bulb warning icon.
Regular inspection — every six months or before long trips — ensures both bulbs are functioning properly.
Tools and Materials You’ll Need
Before beginning your Nissan Xterra headlight bulb replacement, gather the following tools and materials for a seamless experience:
- Replacement headlight bulb (OEM recommended or LED upgrade)
- Flathead and Phillips screwdrivers
- Nitrile or latex gloves (to prevent oil transfer)
- Microfiber cloth and cleaning spray
- Dielectric grease (optional, for connector protection)
Safety Precautions Before Starting
Always prioritize safety when working on your vehicle’s electrical system:
- Turn off the ignition and remove the key.
- Ensure headlights are cool to avoid burns.
- Disconnect the negative terminal of the battery to prevent shocks.
- Work in a well-lit, stable environment.
- Wear gloves — even minimal skin oil can shorten bulb life.
Step-by-Step Nissan Xterra Headlight Bulb Replacement
Replacing your headlight bulb doesn’t require professional experience. Follow these precise steps for a quick, efficient process.
Step 1: Open the Hood
Pull the hood release lever inside your vehicle. Secure the hood with the support rod.
Step 2: Locate the Headlight Assembly
Find the rear of the headlight housing behind the radiator support on the driver’s or passenger’s side.
You may be interested in reading Nissan Qashqai Clutch Replacement Guide: Step-by-Step Procedure
Step 3: Disconnect the Power Connector
Unclip or twist the connector counterclockwise to release it from the old bulb.
Step 4: Remove the Old Bulb
Turn the bulb counterclockwise and carefully pull it out of the socket.
Tip: Do not shake or tap the housing — the reflector is delicate.
Step 5: Insert the New Bulb
Holding the bulb by the base, align the tabs correctly and insert it into the housing.
Twist clockwise until it locks securely in place.
Step 6: Reconnect and Test
Attach the electrical connector to the new bulb and reconnect the battery. Turn on your headlights to verify proper operation.
Step 7: Reassemble and Secure
Replace any covers or clips removed during the process. Ensure the assembly is firmly secured and aligned.
Headlight Aim and Alignment Adjustment
After replacing the bulb, your headlights might require realignment to ensure optimal beam focus.
How to Adjust Xterra Headlight Alignment
- Park 25 feet from a flat wall on level ground.
- Measure the headlight beam height and mark it with tape on the wall.
- Locate the adjustment screws behind the headlight housing.
- Adjust vertically and horizontally until the beam sits slightly below the marked line.
Proper alignment prevents blinding oncoming drivers while maximizing your visibility.
Troubleshooting Common Issues
Sometimes, even after a successful replacement, you might encounter issues. Here’s how to resolve them:
| Problem | Possible Cause | Solution |
|---|---|---|
| Flickering Light | Loose connector or poor ground | Reseat connector or apply dielectric grease |
| No Light Output | Burned fuse or incorrect bulb type | Replace fuse or verify bulb model |
| Condensation Inside Lens | Damaged seal | Reseal or replace housing |
| Uneven Light Beam | Misalignment | Adjust aim using alignment screws |
LED vs. Halogen vs. HID Bulbs — Which Is Best for the Xterra?
Choosing the right bulb affects brightness, energy consumption, and lifespan.
| Bulb Type | Brightness | Lifespan | Pros | Cons |
|---|---|---|---|---|
| Halogen | Moderate | 500–1,000 hrs | Inexpensive, easy to replace | Shorter lifespan |
| HID (Xenon) | Very Bright | 2,000–3,000 hrs | Crisp white light | Higher cost, glare potential |
| LED | Extremely Bright | 25,000–30,000 hrs | Long life, energy efficient | Requires conversion kit |
We recommend LED upgrades for drivers who frequently travel at night or in rural areas — they offer exceptional visibility and minimal maintenance.
You may be interested in readingNissan Qashqai Clutch Replacement Guide: Step-by-Step ProcedureYou may be interested in reading
 Dacia Sandero Tyre Pressure Guide (All Models & Years)
Maintenance Tips for Long-Lasting Headlights
To keep your Xterra’s headlights performing like new:
- Clean the lenses monthly with a plastic-safe cleaner.
- Inspect wiring for corrosion or looseness.
- Avoid touching bulb glass during installation.
- Replace bulbs in pairs to maintain balanced illumination.
- Use protective covers if driving in dusty or off-road conditions.
When to Consult a Professional
If your headlights still malfunction after replacement, it may indicate deeper issues such as:
- Faulty wiring or grounding
- Malfunctioning headlight relay
- Cracked housing allowing water ingress
- Complex LED control modules in upgraded systems
In these cases, visit a qualified mechanic or Nissan service center to prevent electrical damage.
Cost Breakdown: DIY vs. Professional Service
| Service Type | Estimated Cost |
|---|---|
| DIY bulb replacement | $15–$60 (per bulb) |
| Professional service | $80–$150 total |
| LED upgrade kit | $100–$250 (pair) |
Doing it yourself saves significantly, but ensure correct bulb alignment for the best results.
Frequently Asked Questions (FAQs)
What bulb type fits a 2015 Nissan Xterra?
Most 2015 Xterra models use H13 halogen bulbs, but check your owner’s manual to confirm before purchasing replacements.
Can I upgrade my halogen bulbs to LED?
Yes. Purchase an H13 LED conversion kit compatible with your Xterra’s housing. Ensure the kit includes cooling fans or heat sinks.
How long do LED headlights last?
LED bulbs typically last up to 30,000 hours, making them ideal for long-term reliability and brightness retention.
Do I need to replace both bulbs?
It’s recommended to replace both simultaneously to maintain even lighting and color temperature.
Final Thoughts
Performing a Nissan Xterra headlight bulb replacement is one of the simplest yet most impactful maintenance tasks you can do. By following this detailed guide, you ensure crystal-clear visibility, enhanced safety, and cost savings — all while keeping your SUV road-ready for any adventure.
Drive confidently, knowing your Xterra’s headlights will always light the path ahead.
You may be interested in readingNissan Qashqai Clutch Replacement Guide: Step-by-Step ProcedureYou may be interested in reading
Dacia Sandero Tyre Pressure Guide (All Models & Years)You may be interested in reading
 Comprehensive Guide to Kia Sportage Service Costs & Ownership Maintenance
If you want to know other articles similar to Nissan Xterra Headlight Bulb Replacement: Complete Guide to Better Night Visibility you can visit the category Maintenance.
BMW X3 Yearly Maintenance Cost: The Real Cost of Owning One
BMW X3 Service Cost: The Real Ownership Breakdown You Need to Know
Are Audi Q3 Expensive to Maintain? A Real-World Ownership Breakdown
Audi Q3 Yearly Maintenance Cost: The Real Cost of Ownership Explained

Audi Q3 Timing Belt Replacement Interval: The Ultimate Owner’s Guide
Nissan Leaf Service Schedule: The Complete Maintenance Guide for Long-Term Reliability
Leave a Reply
More content of your interest