

Toyota Corolla Rear Brake Replacement: A Step-by-Step Guide
Content in this publication
Introduction
If your rear brakes are starting to squeal, vibrate, or just feel off, it’s probably time to give them some love. Replacing the rear brakes on a Toyota Corolla might sound intimidating, but here’s the good news: with the right tools and a little patience, it’s a totally doable DIY project. Not only can you save some serious cash, but you’ll also understand your car better.
Why Rear Brakes Matter
Rear brakes may not do as much work as the front ones, but they play a huge role in keeping your ride stable and safe.
Safety First
Think of your brakes as your car’s parachute. Without them, every drive would be a wild roller coaster. Properly functioning rear brakes help keep the car balanced when stopping, especially in sudden-brake situations.
Performance and Efficiency
Worn-out rear brakes can make your Corolla work harder to stop, which puts more stress on the front brakes and even the suspension. A smooth brake system means better handling and fuel efficiency.
How the Rear Brakes Work
Before picking up a wrench, let’s talk about how these brakes actually function.
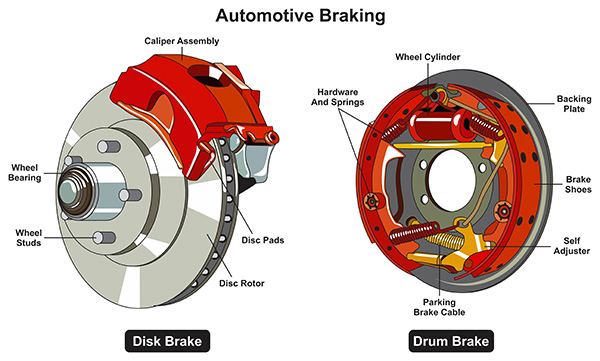
Disc Brakes vs. Drum Brakes
Some Corolla models use disc brakes at the rear, while others rely on drum brakes. Disc brakes use pads that press against a rotor, while drum brakes have shoes that expand inside a drum. The process is slightly different for each, but the principle is the same: friction slows the wheels down.
Signs Your Rear Brakes Need Replacing
Your car will let you know when the brakes are wearing out—you just have to listen (and feel).
Squeaking or Grinding Noises
If you hear high-pitched squeals or grinding, it’s a classic sign your pads or shoes are worn down.
Vibrations or Pulling
A shaking brake pedal or the car pulling to one side can indicate uneven wear or rotor/drum issues.
Longer Stopping Distance
If you need more room to stop, don’t ignore it. That’s your brake system begging for attention.
Tools and Materials You’ll Need
Good prep makes everything smoother.
You may be interested in reading Toyota Corolla Headlight Assembly Replacement: A Complete DIY Guide
Essential Tools
- Lug wrench
- Jack and jack stands
- Ratchet set
- C-clamp or brake caliper tool
- Brake cleaner
- Torque wrench
Replacement Parts
- New brake pads or shoes
- Rotors or drums (if needed)
- Brake fluid
- Anti-seize compound
Preparing Your Toyota Corolla
Before diving into the work, make sure your car is ready.
Park on a Flat Surface
A level surface makes lifting your car safer and more stable. Engage the parking brake (front wheels are safe since you’re working on the rear).
Loosen Lug Nuts and Jack Up the Car
Loosen the lug nuts slightly before lifting the car. Then use the jack and secure it with jack stands—safety first.
Safety Precautions
Never rely on just the jack. Always use jack stands and wear safety goggles. Trust me, brake dust in your eyes isn’t fun.
Step-by-Step Rear Brake Replacement
This is where the magic happens.
Step 1: Remove the Wheel
Use the lug wrench to take off the nuts, then pull the wheel straight off. Set it aside in a safe spot.
Step 2: Access the Brake Assembly
Remove the caliper bolts (for disc brakes) or the drum cover (for drum brakes). Be gentle—some parts may be stubborn.
Step 3: Remove the Old Brake Pads or Shoes
For disc brakes, slide out the old pads. For drum brakes, remove the springs and shoes carefully. Snap a quick photo of the assembly beforehand—it’ll help you reassemble later.
Step 4: Inspect the Rotors or Drums
Run your fingers gently across the surface. If you feel deep grooves or see discoloration, it’s time to resurface or replace them.
Step 5: Install the New Brakes
Apply anti-seize on the backing plate and edges (not the friction surface!). Install the new pads or shoes in the same position as the old ones. Compress the caliper piston with a C-clamp if needed.
Step 6: Reassemble Everything
Reattach the caliper or drum cover, torque the bolts to the manufacturer’s specs, and mount the wheel back on. Tighten the lug nuts in a star pattern for even pressure.
You may be interested in readingToyota Corolla Headlight Assembly Replacement: A Complete DIY GuideYou may be interested in reading
 How to Switch from Trip Meter to Odometer in a Toyota Camry
Bleeding the Brake System (If Needed)
Not every brake job requires bleeding, but if you’ve opened the brake line or replaced the caliper, it’s essential.
Why Bleeding Matters
Air bubbles in the brake line are like tiny sponges—they reduce pressure and make your brake pedal feel squishy.
How to Bleed Properly
- Top up the brake fluid reservoir.
- Have someone press the brake pedal while you open the bleeder valve.
- Close the valve before they release the pedal.
- Repeat until no air bubbles appear.
Common Mistakes to Avoid
Over-Tightening Bolts
Tightening bolts too much can strip threads or damage parts. Use a torque wrench to follow proper specs.
Skipping the Test Drive
Always take a gentle test drive after replacing the brakes. Listen for noises, feel the pedal, and make sure everything’s smooth.
Pro Tips for Longevity
Regular Inspections
Peek at your brakes during tire rotations or oil changes. Early detection saves money.
Brake Fluid Checks
Brake fluid attracts moisture over time, which can corrode components. Replace it as recommended.
When to Seek Professional Help
If you notice anything off during installation—like seized bolts, stuck pistons, or fluid leaks—it’s okay to call in a pro. Better safe than sorry.
Final Thoughts
Replacing the rear brakes on your Toyota Corolla is a practical skill that can save you hundreds of dollars. It’s like giving your car a new pair of sneakers—it’ll stop smoother, ride better, and keep you safer on the road. Follow each step carefully, respect safety precautions, and your brakes will thank you with crisp stopping power.
FAQs
1. How often should I replace the rear brakes on my Toyota Corolla?
Typically, rear brakes last around 40,000–60,000 miles, but it depends on driving habits and conditions.
2. How do I know if my rear brakes are worn out?
Listen for squeals or grinding, feel for vibrations, or notice longer stopping distances.
3. Can I replace only the rear brakes?
Yes, but make sure the front brakes are still in good condition. Balanced braking matters.
Toyota Corolla Headlight Assembly Replacement: A Complete DIY GuideYou may be interested in reading
How to Switch from Trip Meter to Odometer in a Toyota CamryYou may be interested in reading
 2011 Toyota Camry Clutch Replacement: A Comprehensive Guide to Fixing Your Ride
4. Do I need special tools to replace rear brakes?
Mostly basic tools—lug wrench, ratchet, jack stands—but a C-clamp or brake caliper tool makes the job easier.
5. Is it safe to drive with worn rear brakes?
Not really. It might not fail immediately, but it increases stopping distance and puts more stress on the front brakes.
If you want to know other articles similar to Toyota Corolla Rear Brake Replacement: A Step-by-Step Guide you can visit the category Service and Parts.
Jaguar F-Pace Engine Size: Complete Guide to All Engine Options

Jaguar F-Pace Dashboard Symbols: The Complete Driver’s Guide

Jaguar F-Pace Timing Chain Replacement: Cost, Symptoms, and Complete Guide

Jaguar F-Pace Service Cost: What Owners Really Pay for Maintenance

Jaguar F-Pace Service Reset: Complete Guide to Resetting the Service Light

Jaguar F-Pace Timing Chain Replacement Cost: Complete Owner’s Guide
Leave a Reply
More content of your interest